Monday, August 3, 2009

3D Effects

3D Blocks Background Tutorial

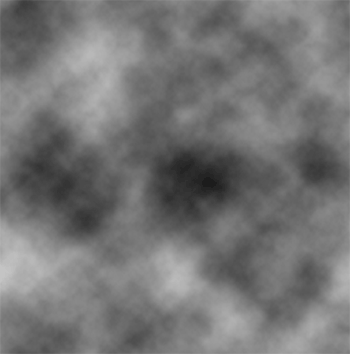
  • Start a new document by pressing CTRL + N. I used 500 X 500 (you can make it any size), than go to Filter -> Render -> Clouds.


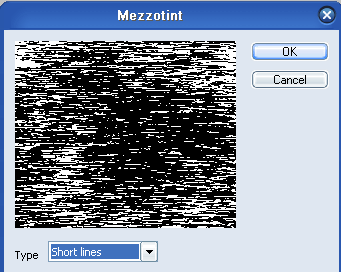
  • Now go to Filter -> Pixelate -> Mezzotint and use the following setttings.


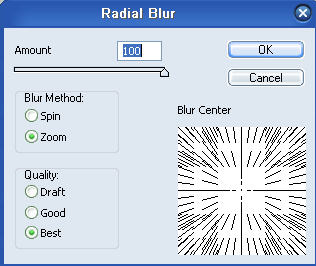
  • After that, go to Filter -> Blur -> Radial Blur and apply these settings.


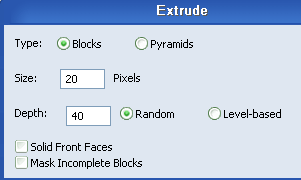
  • Once that's completed, go to Filter -> Stylize -> Extrude and use these settings.


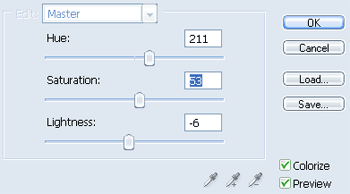
  • Lastly, go to Hue/Saturation by pressing CTRL + U and use the following settings, you can play around with these if you want other colors.


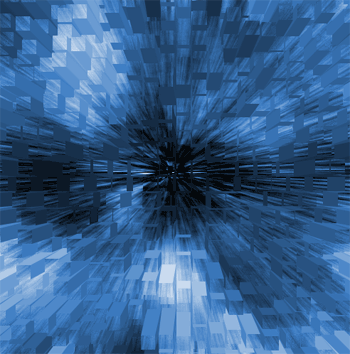
  • This is how your finished background should look.


3D-Photo effect

In this tutorial I will try to explain how to create a
3D effect from a 2D-image


1. This is the original image

2. Start with creating the "Photo-frame" by drawing a selection with the Polygonal Lasso Tool (L). Save the selection as "frame"


3. Now, mask the details that is outside the frame you created in step 2.
When you're done, copy the masked objects and paste it into a new layer

4. Creating the Photo frame
Select the first layer with the original image and Load the "frame selection" that you saved in step 2. Select inverse and hit Delete. Select inverse again and go to
Select > Modify> Contract selection by 15 pixels. Save that selection as Innerframe.

Now, load the selection "frame" and then load the selection "innerframe" and chose subtract from selection, an d it will look something like this.

5. Add a new Layer and fill it with a gradient white to light grey. White top left to light grey bottom right.

6. Creating a shadow.
Add a new layer below the "frame layer", load the selection "frame" and fill it with black. Deselect and apply the gaussian blur filter with amount 5.


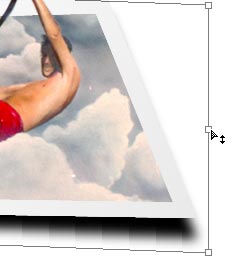
7. Now go to edit > transform > skew and drag it down a little bit on the right side.


8. Set the opacity to about 60%


9. Now, fill the bottom layer with any color you like and you're done!

Sunday, August 2, 2009

Pop Art Inspired by Lichtenstein

Pop Art Inspired by Lichtenstein

Pop Art Tutorial Header

Pop Art Recommended for Beginner to Intermediate Level Photoshop Users


If you are a fan of pop art then you're probably already well acquainted with the work Roy Lichtenstein. Roy Lichtenstein became one of the leading pop artists of the sixties with his comic-strip paintings. Drowning Girl 1963, shown left, is one of his better known works and is a good example of the design features in his most famous pieces. Notice the thick lines, bold colors, and thought bubble. His work also often included boxed captions and words such as "WHAAM!", commonly found in comic books.

Benday dots were Lichtenstein's trademark. Benday dots are a printing process which combines two (or more) different small, coloured dots to create a third colour. Back in the day, pulp comic books used benday dots in primary colours to inexpensively create the secondary colours such as flesh tone.

You can create the benday dot effect by using the Colour Halftone filter found in Adobe Photoshop, however in this tutorial I'm going to show you a way to create a fantastic looking black and white Halftone Pattern. "Why?", because I like the look of it better.


Due to the vivid colors, the pop art that you will create using this tutorial will look fantastic if you get it printed at your local print shop. If you are going to get it printed, in the beginning change the resolution to 300dpi (Image >> Image Size) and at the end of the tutorial change the mode to CMYK (adjust colours if necessary).

There are 2 steps to this tutorial...

STEP 1. Creating the Half Tone Shading
STEP 2. Adding Color

I suggest that you read through this tutorial first before beginning...

STEP 1. Creating the Half Tone Shading

a) Preparing the Canvas

Open your picture in photoshop that is going to become pop art and duplicate the layer called "Background". (Just click the layer called "Background" and drag it to this icon at the bottom of the layer window to duplicate the layer.)

Rename this new layer "dots". (To rename a layer right-click on the name in the Layer Palette and select Layer Properties).

Create another new layer and fill it bright blue using the Paint Bucket tool .

filling layer blue
Drag this layer between the two existing layers and rename it something meaningful i.e "blue". The image below shows what your Layer Palette should look like. This is the basic set up to begin.
Digital Pop Art pic 1

Now working on the "dots" layer we need to clear out all the unwanted parts of the photograph. In this case I want to isolate Scarlett and delete the rest i.e lilac background and bit of text.

To cut out Scarlett I use the Pen Tool. Now to sum up how to use Photoshop's pen tool in a few sentences isn't easy...if you have never used the pen tool before, do the PEN TOOL TUTORIAL first.

Remember to make sure the pen tool is set to create a Work Path. See below.

create work path


*NOTE: You could use the eraser tool but the results won't be as professional.

Take the pen tool create a path around the person (or thing) and then make it into selection. Invert the selection (CTRL + Shft + i) and hit delete. Deselect (Ctrl + D)

Digital Pop Art pic 2

b) Making the Dots
Desaturate the "dots" layer (Ctrl + Shft + U).
Digital Pop Art pic 3
Next adjust Threshold to something dramatic (still working on the "dots" layer).
Image >> Adjustments >> Threshold...
The settings I used are shown in the image below, but you will need to experiment to see what threshold settings works for YOUR image.
Digital Pop Art pic 4
Using Threshold will leave the image looking very pixelated (jagged). So apply Gaussian Blur (approximately a 2-3 pixels should do it). Filter >> Blur >> Gaussian Blur...
Digital Pop Art pic 5
In your Layers Palette right-click on the "dots" layer and select Duplicate Layer.... See image below.
Digital Pop Art pic 6
Select New for the Destination Document. Now you will have 2 documents open in photoshop.
Digital Pop Art pic 7

Working on your new document change the Mode to Greyscale.
Image >> Mode >> Greyscale
A dialogue box appears..."Discard color information?"...Click OK.

Now change the Mode to Bitmap.
Image >> Mode >> Bitmap
A dialogue box appears..."Flatten layers?"...Click OK.
Choose Halftone Screen on the Bitmap options window. Click OK. See image below.

It pretty obvious but make sure your out put resolution is the same as the input. If your design is going to be printed than the input should be 300 pixels/inch and your out put will be 300. If you're input doesn't equal your output the you'll end up with a change in size!

Digital Pop Art pic 8
Next appears the Halftone Screen box. Apply the settings shown below. Note you may want to experiment with the Frequency as this decides the size of the dots. Click OK.
Digital Pop Art pic 9
Almost there with the dots. All that's left is to transfer the dots back to the first document. (See part C).
Digital Pop Art pic 9
Note if your dots aren't looking very good you may have forgotten to apply blur or need to apply more blur. The smoother gradient is, the better halftone pattern.

c) Organising

Change the Mode back to Greyscale
A dialogue box will appear...Make sure the size ratio is 1 and click OK.
Now change the Mode back to RGB.

In your Layers Palette right-click on the layer and select Duplicate Layer.
There should be 3 three options as the Destination Document. Choose your original psd (which should be the top one). See image below.

Digital Pop Art pic 10
Your Layers Palette should look like the one shown below. You can close the second psd that you created..there's no need for it now.
Digital Pop Art pic 11
The final step for creating the dots is to create a Clipping Path between the new layer and the "dots" layer.
To create a Clipping Path...hold down the ALT key and move your cursor between the 2 layers in your Layers Palette. When the cursor turns into a "double bubble" (see image below) click to create the clipping path.
Digital Pop Art pic 12
Now link the "dots" and "Background copy" layer. See image below.
Merge Linked layers (Ctrl + E)
If you are using Photoshop CS or CS2 instead of linking and than merging the linked layers, after the creating the clipping path simply click on the "background copy" layer in your layer palette and than merge down.
Digital Pop Art pic 12b
Your picture should now look like the one shown below..only better because it's not so small and compressed!
Digital Pop Art pic 13
Now is a good time to Save (Ctrl + S) your work.

Turn Photos of People into Line Art

Turn Photos of People into Line Art


Scarlett Johansson

Line Art Tutorial Recommended for Intermediate Level Photoshop Users


First up I'd like to ease your mind and let you know that you don't need to know how to draw to complete this tutorial. It's basically tracing, except that tracing is alot easier in Adobe Photoshop. Creating line art with this technique will take several hours to do a good job...if you want a tutorial that just applies a couple of filters, then this tutorial is not for you!

You will need to know how to use the PEN TOOL for this tutorial. (If you don't know how to use the pen tool complete the fast tutorial found HERE first).

I am currently using Photoshop 7.

I suggest you read through the entire tutorial first, before you begin.

1) Preparing the Layers

Open your photo in Photoshop. Rename the layer "original".
If your picture is quite dark you will need to lighten it a little. The reason for this is that we will be tracing over the photo in black so we need to be able to see the lines we are creating clearly.

Photo to Art pic 1

Adjust the Brighness of the photo
Image >> Adjustments >> Brightness/Contrast...
Photo to Art pic2

Duplicate the "original" layer. Rename this new layer "top".

Create two more new layers. Place them under the "top" layer.
Fill the layer closest to the "original" layer white and rename it "background".
Leave the other layer transparent and rename it "line art"

Turn the visibility OFF for the "background" and "top" layers.
Visibility ON for the "line art" and "original" layers and the "line art" layer is active. See image below.
(All this organisation will be explained soon).

Photo to Art pic 3

We are now set to create the line art.

2) Brush Tool Settings

When creating line art you want to vary to thickness of the line (line weight). Varying the line weight emphasizes the perspective of the drawing. As lines become closer the viewers the lines get thicker. Lines taper towards the furtherest part of the object. The image below shows an exaggerated example of this. Also areas that fall into shade can have a heavier line, while areas in light can be represented with a thinner line. A good way to get better idea of this is by studying the line art of comic books.

Another technique is to use just two line weights. A heavier line is used for the outer edges of the object and all internal lines are a smaller size. I'm not a fan of this style but each to their own, as long as your picture doesn't look flat.

Photo to Art pic 4

To taper the lines in Photoshop we need to adjust our Paint Brush Settings.
Click on your Paint Brush tool. Now click on the brush palette tab at right top of your photoshop screen. See image below.

Photo to Art pic 5

The settings you use are going to vary with each line you create, especially the diameter. Below shows one Brush Tip Shape I used.

Photo to Art pic 6

Next click on the Shape Dynamics.

1. Set the Control to Fade. (This will allow our line to taper).

2. Adjust the fade setting. (I'm using 250 here but try experimenting with various combinations of 2 & 3).

3. Adjust the Minimum Diameter. (I'm using 27% here but the key to great line art is variety so experiment).

foreground

Make sure your foreground colour is black. See image above.

3) Creating the Paths

The best place to start is the center of focus, which is normally the face. Since I'm using an image of Scarlett Johansson I'll start on her lips.
Remember the point where you start the path is going to be the thickest.

Make sure the pen tool is set to Create New Work Path. See below.

Photo to Art pic 6b

Create a path paying attention to the angle of the curves.
Note: Keep the distance of each line rather short. Don't try to create one line to go right around the lips.

Photo to Art pic 7

Once you are happy with the path, right click and select Stroke Path... See below.

Photo to Art pic 8

Turn ON the visibility of the white "background" layer. Delete the path (right click and select Delete Path).

Now you can clearly see the line you have created.

If you are happy turn OFF the white "background" layer and create the next line.
If not use your History Palette. See image below. By clicking here you can adjust the curve or paint brush settings.

Photo to Art pic 9

If the line is only slightly off you can use the Eraser Tool. Rather than using the eraser tool in a up/down motion, move it on a diagonal to the line art. That way the line will have a tapered effect at the end. See image below.

Photo to Art pic 10

To create a line that is tapered at both ends like the one shown below. In the brush Shape Dynamics Window change the Control from Fade to Pen Pressure, and the Minimum Diameter to 1%. See second image below.

Photo to Art pic 11
Photo to Art pic 12

When you select Stroke Path this time check the Simulate Pressure box. See image below.

Photo to Art pic 13

Once you have finished creating an item, like the lips, it's important to check them against the original. Turn the visibility ON for the white "background" layer. Turn ON and OFF the visibility of the "top" layer. If it looks like the lips are "jumping" then you will need to adjust the line art.

To create very thick line areas, such as the eyebrows shown below, we create a closed path and choose Fill Path instead of Stroke Path. (A closed path means that there should be no ends to the path, like a circle.)

Photo to Art pic 14

The image below shows the upper eyelash path I created. I also used Fill Path here.

Photo to Art pic 15

To create shapes that are round, square, oval, etc remember to use the Shape Tools. (Found next to the pen tool). The image below shows how I created the iris outline using the Ellipse Tool to save time.

Photo to Art pic 16

I guarantee that you will get faster and faster at this technique of creating line art in Photoshop, so stick with it.

Photo to Art pic 17

On the following page is an image of the Scarlett Johansson line art I created with some helpful notes.
I hope you found this Photoshop tutorial helpful.
Feel free to contact me via my contact page if you have any questions.

Below is the Scarlett Johansson line art I created with Photoshop. I added a few notes for those of you who are new to creating line art.
I hope this is helpful. Remember you can always contact me via my contact page if you have any questions regarding this tutorial.

On the following page I've decided to put some of the work that others have achieved great results following this tutorial.

Scarlett Johansson Line Art


LOVE YOUR WORK!

From time to time people send me pictures of their work that they have achieved through following my tutorials. I decided to put some of the best here ...